
Linux
Linux settings
In case of problems, please see also our FAQ for OpenVPN.
Tested with Debian/Ubuntu and Fedora.
You can install and execute OpenVPN on the command line as well as with a graphical user interface (Network Manager).
Start openvpn on the command line
- Install the VPN client:
The easiest way to install the OpenVPN client is using the package management system of the particular Linux distribution. Enter one of the following commands as root (or use sudo):
- Ubuntu/Debian: (sudo) apt install openvpn
- Fedora: (sudo) yum install openvpn
- Download the appropriate configuration file: kit.ovpn bzw. kit-split.ovpn
For VPN2VLAN: kit-vpn2vlan.ovpnRightclick on the appropriate configuration file and choose “Save target as...”. Save the file in any folder (e.g. create a new folder in your user folder e.g. “VPN”).
- Start the OpenVPN client with the downloaded configuration file:
The easiest way to install the OpenVPN client is using the --config argument to specify the location of the configuration file. Run following command:
- sudo openvpn --config /path/to/kit.ovpn
(where /path/to/ is the folder you saved the configuration file in e.g. ~/VPN/)
- sudo openvpn --config /path/to/kit.ovpn
Under certain circumstances (for example, when accessing the home or OE drive via VPN), you must ensure that the KIT resolvers are configured for DNS resolution with VPN.
Further information on starting the OpenVPN client from terminal can be found here. .
Using a graphical user interface
There is an OpenVPN plug-in for NetworkManager. If not already installed you can find instructions on installing below.
Attention with Network Manager configuration files: Network Manager does not support connection blocks. If you use Network Manager you must download the individual configuration files. Recommended is kit-v6.ovpn, kit-v6-split.ovpn or kit-vpn2vlan-v6.ovpn. If IPv6 is not available with your internet connection choose the files with v4 instead of v6. For restrictive environments choose kit-v4-tcp-443 or kit-vpn2vlan-v4-tcp-443.
Import the configuration file or configuration files of your choice into Network Manager. The procedure is described below.
Note on VPN split: If you use VPN-split, go to NetworkManager → both IPv4 Settings and IPv6 Settings → Routes... and check "Use this connection only for resources on its network".
Note on DNS Resolution: Network Manager itself should ensure that the KIT resolvers are configured for DNS resolution with VPN. So no further action is required here.
Debian/Ubuntu with GNOME
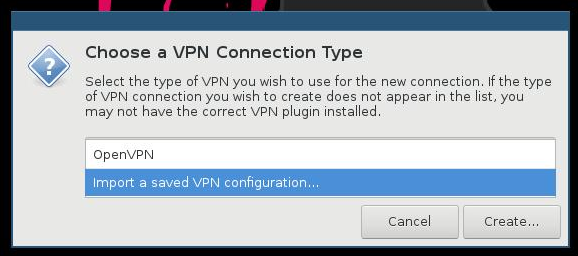
If not already installed it is sufficient to install the package network-manager-openvpn-gnome, the rest will be installed automatically. The configuration file above can then be imported to NetworkManager. Click on "Add a VPN configuration..." and then scroll down to "import a saved VPN configuration...".

Fedora with GNOME
If not already installed it is sufficient to install the package NetworkManager-openvpn-gnome, the rest will be installed automatically. The configuration file above can then be imported to NetworkManager:
- Start NetworkManager
- Network settings
- Click "+" icon (“add”)
- VPN
- “Import from file”
- Select previously saved configuration file
- Enter user name and password
- Save
To start VPN click on the NetworkManger icon and switch “kit” from “0” to “1” (or from “Off” to “On”)
Using KIT resolvers for DNS resolution
There are a few DNS names at KIT (especially the file service) that can only be resolved with the KIT resolvers. The OpenVPN server informs the client of the KIT resolvers. However, these must then be configured in the system so that they can be used.
In Network Manager, this should be carried out by Network Manager itself and no further action should be necessary.
On the command line, this only happens if you follow the instructions below for resolvconf or systemd-resolved.
Debian/Ubuntu/Mint: resolvconf (without systemd-resolved)
On Debian/Ubuntu/Mint the package resolvconf is available. If this is installed, you can execute OpenVPN as follows:
sudo openvpn --config kit.ovpn --config /etc/openvpn/update-resolv-conf.conf
The second OpenVPN configuration file /etc/openvpn/update-resolv-conf.conf must first be created with the following content:
script-security 2
up /etc/openvpn/update-resolv-conf
down /etc/openvpn/update-resolv-conf
But this only works if systemd-resolved is not activated on your system. It is activated starting from Ubuntu 16.10. What to do then is described in the next section. In case your operating system was upgraded from an earlier version systemd-resolved might not be activated.
If systemd-resolved is not activated on your system install the package resolvconf if necessary.
systemd-resolved
Starting from Ubuntu 16.10 and Fedora 33 systemd-resolved is activated by default. Of course you can also activate it manually.
With systemd-resolved you can use the script update-systemd-resolved in order to get your resolver configuration updated:
https://github.com/jonathanio/update-systemd-resolved
Invoke openvpn then as follows:
sudo openvpn --config kit.ovpn --config /usr/bin/update-systemd-resolved.conf
The second OpenVPN configuration file /etc/openvpn/scripts/update-systemd-resolved.conf must first be created with the following content:
script-security 2
setenv PATH /usr/local/sbin:/usr/local/bin:/usr/sbin:/usr/bin:/sbin:/bin
up /usr/bin/update-systemd-resolved
up-restart
down /usr/bin/update-systemd-resolved
down-pre