
Inhaltsübersicht
sprungmarken_marker_19003
Information for the operation of DFN mailing lists
General information
The website https://www.listserv.dfn.de is available for the administration of DFN mailing lists.
You can use this website to manage your mailing lists and subscribe to mailing lists or unsubscribe from mailing lists.
To use this website, you can log in with your e-mail address and a password, which you must set before logging in for the first time.
Important: You must always log in with the exact e-mail address with which you are registered as the owner, moderator or subscriber of a list.
Logging on to the DFN mailing list server website
- Go to the website https://www.listserv.dfn.de.
- Click on the "Login" button at the top right.
- Enter your e-mail address and the corresponding password for the DFN listserv service and click on "Go"
Don't have a password yet or forgot your password?
- Click on "Login" in the top right-hand corner and then on "First login?” or “Lost password?”
- Enter your e-mail address and click on "Request first passwd" or "Request new password"
- Confirm that you really want to request a first or new password.
- You will then receive an e-mail with a link that you can use to set a new password.
Change your e-mail address and other user settings
- Log in with your e-mail address and password.
- Click on "My preferences" at the top right under your e-mail address.
- Enter your new address under "Changing your e-ail address" and confirm the process with the "Change Email" button.
- You will then receive an e-mail at the new address.
Click on the confirmation link in this message. Only then will the new address be permanently adopted. - Further settings (optional)
On the same page you can change your name (optional), the language or your password, for example.
Request a new mailing list
Previous process
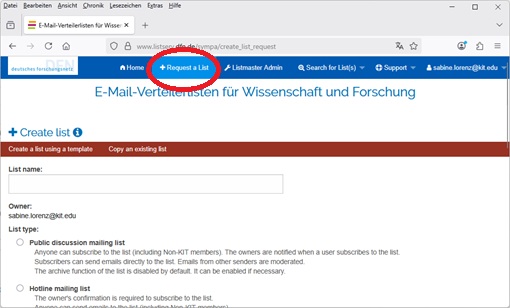
- After logging in to the website,all users can select "+Request a list" from the blue menu at the top.
To create a new list, please proceed as described in the section "Procedure for creating a new mailing list". - DFN will check the request and the listmasters will approve or reject the list accordingly.
- This procedure is still active in most institutions.
New process
- Only authorized users of an institution may create new lists.
All other users of this institution will not see the "+Request a list" item in the blue menu on the website.
If you do not see this item after logging in with your e-mail address, please contact the helpdesk of your institution.
The process is different for each participating institution and is documented by the institutions themselves on their websites. - The e-mail addresses of the authorized users of an institution are stored in an authorization list that is maintained by the institutions themselves.
- The lists created by the authorized users of an institution are directly active and no longer need to be released by DFN and Listmaster.
- This procedure is currently only active in a few institutions and has been agreed with these institutions.
Procedure for creating a new mailing list
Call up the request page
After logging in to the website, click on + Request a list in the blue menu at the top to access the request page.
If you do not see the"+ Request a list" item in the blue menu at the top even after logging in to the website, the new process is probably already active for your institution (see above).
Select procedure
- Creating a list using a template - suitable if you need a new, independent list.
- Copy an existing list - useful if you want to copy the configuration of an existing list.
Enter details (for "Creating a list using a template")
- List name
- Short, unique and consisting only of the characters A-Z, 0-9 and hyphen.
- Example: ag-bioinformatics → the list can then be accessed at ag-bioinformatics ∂does-not-exist.listserv dn de .
- When referring to an institution, a prefix is recommended (e.g. wiwi- for the Faculty of Business Administration and Economics).
- List type (template)
- Public discussion list - for discussion lists to which anyone can subscribe
- Hotline list - for lists via which those responsible for a service can be reached
- Newsletter - for pure information distribution.
- Private workgroup - for closed discussion lists.
- All parameters (who can write, subscribe, archive) can be changed later.
- Subject
- Short title describing the topic or purpose of the list.
- Institution
- Please select your institution or “Other” if your institution is not listed here.
- Description
- Text that is displayed on the start page of the mailing list.
- At least one short sentence is required.
Copy list (for "Copy an existing list")
- Select the source list from the drop-down menu.
- Enter the new list name.
- Click on Copy list configuration.
- Then check and adjust the title and description of the new list.
To be able to copy an existing list, you must be entered as the owner of the existing list.
Please note:
When copying, the automatic integration of subscribers is also transferred.
Lists that automatically include subscribers should therefore not be copied.
Renaming a mailing list
Previous process
- All (privileged) owners of mailing lists can rename lists.
- To do this, log in with your e-mail address and your DFN listserv password and open the administration page of the list in question.
- There, click on the"Rename List" button.
- On the following page, enter the desired new list name and click on"Rename this list".
- The list must then be released by a list master under the new name before the list can be used again.
- This procedure is still active in most institutions.
New process
- In future, the renaming of mailing lists can also only be carried out by authorized users of an institution who are entered in the authorization list.
They must also be entered as (privileged) owners of this list.
If you have logged in with your e-mail address and your DFN listserv password and do not see the"Rename List" button (below "Remove list") on the administration page of the list in question, even though you are entered as the privileged owner of the list, the new process is probably already active for your institution. - In this case, please contact your institution's helpdesk and ask which e-mail address you need to temporarily enter as an additional owner so that they can rename the list.
- The lists that are renamed by the authorized users of an institution are directly active and no longer need to be released by DFN and Listmaster.
- This procedure is currently only active in a few institutions and has been agreed with these institutions.
Deleting a mailing list
- Log in with your e-mail address and your DFN listserv password and open the administration page of the list in question.
- There, click on the"Remove list" button.
- You will then be asked whether you really want to close the list.
If you answer this question with OK, the list will be deactivated and permanently deleted after 14 days.
Tasks as list owner and moderator of a mailing list
- What you can do as a list owner
- Change configuration - adjust all list settings (e.g. access rights, archiving, moderation).
- Manage subscribers - add new members or remove existing subscribers.
- What you can do as a moderator (with moderation activated)
- Approve posts - check incoming messages and approve them for the entire list.
- Reject posts - prevent unwanted messages from being sent.
(The moderation rights must be explicitly activated in the list configuration. Only if no moderators are entered do the owners automatically have moderation rights).
How to access the administration interface
- Overview of your lists
- After logging in to the Sympa website, click on "My lists" .
- You will be shown an overview of all lists for which you are a subscriber and/or owner.
- Quick access
- List subscribers - as the owner, you can see all current members via the "List subscribers" link.
- Archives - use the "Archives" link to open the news archive of the respective list (if you have the authorization).
- To the list page
- Click on the list name. This will take you to the main page of the respective mailing list.
- If you are the owner, the most important administration options are displayed on the main page (e.g. "Manage subscribers", "List configuration").
- Administration menu
- For a complete list of all available functions, click on "Administration" in the left-hand navigation area.
Changing the subject of a list
- Log in with your e-mail address and your DFN listserv password and open the administration page of the relevant list.
- Select the value"List definition" in the red bar under"Edit List Config" and click on it.
- On the following page, enter the desired text under"Subject of the list" and click on the"Apply modifications" button to activate the change.
Changing the visibility of a list
- Log in with your e-mail address and your DFN listserv password and open the administration page of the relevant list.
- Select the value"List definition" in the red bar under"Edit List Config" and click on it.
- Select the desired setting under"Visibility of the list" and click on the"Apply modifications" button to activate the change.
Available visibility options
|
Setting
|
Who can see the list?
|
|---|---|
|
Only visible to subscribers
|
Only email addresses that have registered on the https://www.listserv.dfn.de website and subscribed to the list.
|
|
Visible
|
Anyone, even without registration - the list appears in the public search and overview.
|
|
Invisible - even for subscribers
|
The list is not displayed in any search or overview, even for registered subscribers.
|
Changing the description of a mailing list
- Log in with your e-mail address and your DFN listserv password and open the administration page of the relevant list.
- Select the value"List description/homepage" in the red bar under"Edit List Config" and click on it.
- On the following page, click on"Edit" to the left of"List description"
- In the window that opens, enter the desired text and click on the"Save" button.
This text will be displayed as a description on the main page of the mailing list by default and will also be sent to new list subscribers as part of the welcome email.
If you want to display a different text (e.g. in HTML format) on the main page of the mailing list, click on"Edit" to the left of"List homepage" and enter the desired text on this web page.
Displaying and editing mailing list owners and moderators
Manage owners
- Log in with your e-mail address and your DFN listserv password and open the administration page of the relevant list.
- Select the value "Owners" in the red bar under"Users" and click on it.
Alternatively, click on"Modify owners or moderators" on the main page of the list to go to the same web page. - Add owner
- Enter the desired e-mail address in the "email address" field under "Add owners".
Optionally, you can also enter the person's first name and surname here.
Under "reception mode" , select whether this email address should receive the emails that are sent to the owners of the list (<list name>-request∂listserv.dfn.de).
Under "visibility", select whether the name or local part of this email address from the website should be displayed as the owner. - Click on"Apply modifications" to enter the email addresses as owners
- Enter the desired e-mail address in the "email address" field under "Add owners".
- Remove owner
- Place a tick in the small square to the right of the address to be removed
- Click on "Apply modifications" and confirm in the dialog that appears that the selected owners should really be removed.
Note: According to the guidelines for operating mailing lists, at least one email address from an authorized institution must always be registered as owner.
Manage moderators
The procedure for adding and removing moderators is identical to managing owners.
Select the value "Moderators" in the red bar under"Users" and click on it to access the website with the moderators.
Note: If no moderators are entered, all owners automatically have moderator authorization.
As soon as at least one moderator is entered, only these e-mail addresses have moderator authorization.
Display & edit subscribers to a mailing list
- Log in with your e-mail address and your DFN listserv password and open the administration page of the relevant list.
- Select the value"Subscribers" in the red bar under"Users" and click on it.
Alternatively, click on"View the list of subscribers" on the main page of the list to access the same website.
Add a single e-mail address
- Enter the desired e-mail address in the "Add subscribers" field
- Optional: Check the box "Quiet (don't send welcome message)" if no automatic information mail should be sent.
- Click on the"Add" button to enter the e-mail address in the list
Add several e-mail addresses at the same time
- Click on the"Multiple add" button.
- In the next form, enter each e-mail address in a separate line or insert it using cut + paste.
- Optional: Check the box "quiet" if you do not want an automatic welcome email to be sent.
- Click on the"Add subscribers" button to add the email addresses to the list
Important: Subscribers are added without confirmation by the recipients. Make sure that the persons concerned have given their consent.
If you add the subscribers to the list silently, you must ensure that the users are informed of the entry by other means.
Remove e-mail addresses
- Check the box to the left of the email addresses to be deleted (individually or several at once)
- Click on the"Delete selected email addresses" button at the bottom of the page
Edit entry
- Click on the e-mail address to be changed
- On the following page you can customize
- the address itself
- the associated name
- the reception mode
- the visibility of this e-mail address
- Click on"Apply modifications" to save the change.
Setting Subscription
- Log in with your e-mail address and your DFN listserv password and open the administration page of the relevant list.
- In the red bar under "Edit list configuration" select "Privileges" and click on it.
Alternatively, you can access the same page via the list’s main page and the link "Change who can subscribe/unsubscribe and view list information." - Various options are available in the "Who can subscribe to the list" field. The most common options are:
- Subscription request confirmed – Anyone can subscribe to the list and must confirm the subscription by clicking a confirmation link sent via email (double opt-in). If the subscriber has already authenticated on the website, this is no longer necessary.
- Abonnement-Anfrage bestätigt (Eigentümer wird benachrichtigt) – Anyone can subscribe to the list and must confirm the subscription by clicking a confirmation link sent via email (double opt-in). If the subscriber has already authenticated on the website, this is no longer necessary.
The list owners receive an informational email when a subscriber has subscribed to the list. - Bestätigung durch Abonnent und Eigentümer – The subscription must first be confirmed by the subscriber by clicking a confirmation link (double opt-in); then, an owner must also confirm the subscription.
- To change the value for this parameter, select a value from the drop-down list and click "Apply Modifications" at the bottom of the page.
Security Note
A double opt-in is mandatory. Without this mechanism, any user could add arbitrary email addresses to the list, which could lead to abuse and spam.
Archiving emails from a mailing list
Default setting
When setting up a new mailing list (from a template), the archiving of sent messages is deactivated.
Change archiving parameters
- Log in with your e-mail address and your DFN listserv password and open the administration page of the relevant list.
- Select the value "Archives" in the red bar under"Edit List Config" and click on it.
Switch archiving on or off
- Under "Store distributed messages into archive", select the value "enabled" or "disabled" and click on the"Apply modifications" button to activate the change.
Adjust access rights
- Select a value under "Archives -> access right" and click on the "Apply modifications" button to activate the change.
The default value "subscribers only" means that only subscribers can access the website with the archive of the list and is a sensible setting in most cases.
Note on security
The archive should not be publicly accessible, as otherwise all contents of the mailing list can be viewed by anyone.
If you deliberately make the archive public, explicitly inform all potential senders that their messages will be publicly visible.
Deleting subscribers with delivery errors
Why deleting addresses with delivery errors is important
- Protect reputation: Undeliverable addresses degrade the reputation of the mail servers used.
- Reduce the risk of spam: If the reputation drops, the system can be classified as a spam sender - the recipient servers then reject all list messages.
Display delivery errors
- Log in with your KIT account and open the administration page of the relevant list.
- Click on"Bounces" in the red bar.
- On the page displayed, you can see for each address:
- Number of delivery errors
- the period in which the errors occurred
- the current value for the Bounce score (see section 4).
Displaying the last delivery error for an e-mail address
- Click on the affected e-mail address
- At the bottom of the next page, click on"View last bounce"
- There you will see details (error message, time, type of error).
Manually removing e-mail addresses from the list
- Check the box to the left of the desired e-mail addresses (individually or several at the same time)
- Click on the "Delete selected email addresses" button at the bottom of the page and confirm on the next page that you wish to delete the selected e-mail addresses
Automatic deletion mechanism
Sympa assigns a point value (delivery error code) to each e-mail address that is repeatedly undeliverable.
The calculation of this value depends on the number and type of delivery errors. The higher this value is, the higher the probability that the e-mail address is no longer functional and should be removed from the list
Configuration of the automatic deletion mechanism
- Log in with your e-mail address and your DFN listserv password and open the administration page of the relevant list.
- Select the value"Bounces" in the red bar under"Edit List Config" and click on it.
- There are two levels for each of which you can define an action and a limit value.
- Adjustment of the limit values:
- High delivery rate (many emails/month): the default values (45 / 75) are useful.
- Low sending rate (few emails/month): select lower thresholds, e.g. 8 points for the 1st level and 12 points for the 2nd level.
- Actions when the thresholds are reached
- Default value for the 1st level"send notification to user with delivery errors":
The affected user and list owners are informed that the email address may be removed from the list. - Default value for the 2nd level"remove users with delivery errors":
The affected user will be removed from the list and the list owners will be informed.
You should not change these actions, as otherwise you will have to remove the e-mail addresses that can no longer be reached manually on a regular basis.
- Default value for the 1st level"send notification to user with delivery errors":
Defining the sending authorization
- Log in with your e-mail address and your DFN listserv password and open the administration page of the relevant list.
- Select the value"Sending/receiving setup" in the red bar under"Edit List Config" and click on it.
Alternatively, click on "Change who can post to this list" on the main page of the list to access the same web page. - Various options are available in the "Who can send messages" field. The most common options are
- Public list - Anyone can post, spam flags are ignored.
- Öffentliche Liste, Spam-Mails leise an Moderatoren - Anyone can write; messages for which the central spam filter has set the X spam flag to "yes" are silently forwarded to the moderators for approval.
- Restricted to subscribers - Only e-mail addresses entered in the list may post.
- Private, moderated for non-subscribers - Subscribers write directly; the emails of all other senders are forwarded to the moderators for approval.
- Moderated - Only moderators write directly; all other e-mails are forwarded to the moderators for approval.
- Newsletter, restricted to moderators - Only moderators are allowed to write; all other messages are rejected.
There are also further options with special procedures regarding feedback to senders, further write authorizations for certain groups of people and confirmation requests to the senders.
If no scenario from the selection list meets your requirements, special scenarios can be configured for individual lists. In this case, please contact us with your requirements.
- To change the value for this parameter, select a value from the selection list and click on "Apply modifications" at the bottom of the page.
Assigning send authorizations via address lists
The DFN-Listserv service also provides three special address lists with which you can granularly control write permissions:
|
Address list
|
Purpose
|
|---|---|
|
Blocked senders
|
Prevents the registered addresses from sending messages to the list at all.
|
|
Moderated senders
|
Emails from these addresses are always forwarded to the moderators for approval.
|
|
Allowed senders
|
Enables write permissions for individual email addresses that are not subscribers to the list (useful if the general send permission is set to "restricted to subscribers").
|
Making entries in these lists
- Log in with your e-mail address and your DFN listserv password and open the administration page of the relevant list.
- Select the desired address list in the red bar under "Sender Lists" - "Blocked senders", "Moderated senders" or "Allowed senders"
- Enter the e-mail address(es) in the selected list and click on the "save" button at the bottom of the page
Priority of the lists
If an address appears in several lists, the following order applies (highest priority first):
- Blocked senders
- Moderated senders
- Allowed senders
All three address lists have a higher priority than the setting under "Who can send messages" in the "Sending/receiving setup".
Note:
The "Allowed senders" and "Moderated senders" lists are currently provided via a Sympa plug-in and are not part of the official core setup.
This results in two practical limitations:
- Navigation: after adding entries to these lists, you must return to the administration page again for the horizontal navigation bar to display correctly again.
- Feedback: For addresses that are in the "Allowed senders" list, no automatic confirmation of receipt is generated when their message is distributed via the mailing list.
Moderation of a mailing list
If a message is sent to a moderated list, all moderators with the receive mode set to "Receive notification email" will automatically receive a mail.
This moderation mail contains the original message as an attachment, if it has not been marked as spam, and also the sender's e-mail address
Moderation by e-mail
- You can read the original message in the e-mail attachment.
- To forward the e-mail to the list, click on the forward link in the moderation e-mail - this will open an e-mail window that has already been filled in, which you only need to send.
- To reject the e-mail, click on the reject link in the moderation e-mail - this will also open an e-mail window that has already been filled out and which you only need to send.
Note:
If another moderator has already approved or rejected the message, you will receive an e-mail informing you that the action is no longer possible and that the message may have already been sent.
- As the moderator of a list, you can view the messages awaiting approval on the list's moderation page.
You will also find the link to this website in the moderation email
Alternatively, you can access the same page from the main page of the list via the left-hand navigation bar "Moderate → Message". - On the moderation page, you will see a list of the messages to be moderated.
- In this list, click on the eye on the left to display the full content of a message.
- Place a tick in front of the desired message.
- Then select one of the two actions:
- "Distribute selected e-mail " - Release message.
- "Reject selected e-mail " - Reject message.
When rejecting, you can decide whether the sender should receive a rejection notification.
Recommendation: Do not send a notification for clear spam; a brief explanation may be useful for legitimate senders.
Passive moderators
Sometimes a user should have moderator rights but not receive moderation emails (e.g. a person with write authorization who should not actively moderate).
To do this, set the reception mode for the moderator in question to "No notifications" on the website with the moderators (see "Display and edit owners and moderators of a mailing list" above)
Optimize e-mail deliverability: Activate DMARC protection
To ensure that emails reach all subscribers of a list reliably, we recommend setting the "Protection modes" parameter under "DMARC protection" to "all" for existing lists.
This will:
- the from address of the original sender is replaced by the list address.
- a valid DKIM signature is added for the @listserv.dfn.de domain.
Advantages:
- Better deliverability: mail servers no longer block emails that originate from external senders but contain an internal email address.
- DKIM signature: Many mail servers only accept emails with a valid DKIM signature. Without this, emails could be rejected or moved to quarantine.
How to configure DMARC protection:
- Log in with your e-mail address and your DFN listserv password and open the administration page of the relevant list.
- Under "Edit List Config" (in the red bar), click on "DKIM/DMARC/ARC".
- Under "DMARC protection" -> "Protection modes", select the value "all" and click on "Apply modifications" at the bottom of the page.
Notes:
- The Reply-To address remains unchanged. For lists with "From address" as reply-to address, replies are still sent to the original sender.
- Warning messages may appear for digitally signed emails as the sender and signer data do not match.
- It is no longer possible to reply to the sender and the list address at the same time by clicking on "Reply to all" in Outlook.
For new lists:
This setting is the default for newly created lists based on templates. For lists that are created by copying existing lists, the value of the original list is adopted.
Adding a footer to the emails of a mailing list
Note:
The Sympa mailing list server only adds footers to unsigned messages.
Adding a footer to a signed mail would invalidate the signature.
Setting up a footer
- Log in with your e-mail address and your DFN listserv password and open the administration page of the relevant list.
- Select the value "Message templates" in the red bar under"Edit List Config" and click on it.
- On the following page, click on"Edit" to the left of "Message footer"
- In the window that opens, enter the desired text and click on the"Save" button.
Personalized unsubscribe link
To provide each recipient with a personalized "unsubscribe link", insert the following line into the footer text, for example:
To unsubscribe from this list, please click here: [% wwsympa_url %]/auto_signoff/[% listname %]?email=[% user.email | uri %]
Prerequisites: Message personalization must be activated for the list.
To activate personalization:
- On the administration page → "Edit List Config" → "Sending/receiving setup".
- Under "Allow message personalization", select the "Enabled" option and click "Apply modifications" at the bottom of the page.
- In the "Message personalization" section, select the value "Header and footer" under "Scope for messages from incoming email".
Note:
By default, the footer is attached as a MIME attachment.
In some clients (e.g. Outlook), it therefore does not appear at the end of the actual text, but in the attachment.
To attach the footer directly to the text, proceed as follows:
- On the administration page → "Edit List Config" → "Sending/receiving setup".
- Under "Attachment type", select the option "Append to message body" and click on "Apply modifications" at the bottom of the page.
Note:This setting only works reliably for messages in plain/text format. The result may vary for HTML mails.
Increasing the maximum message size
The default limit for sending messages via a mailing list is 5 MB.
If this value is not sufficient for your purposes, please contact listmaster∂listserv.dfn.de as the list owner.
We will be happy to increase the limit as required - especially if the list has only a few members.