
Storing and synchronizing files securely - recommendations for end-user devices
If data (documents, media files, e-mail archives) is only stored locally on the hard disk of the end device, there is a risk of data loss as this data is not backed up automatically. The server-based services of the SCC, on the other hand, back up your data centrally, automatically and in accordance with professional standards - a local backup on the workstation computer is therefore generally superfluous.
In particular, the use of the server-based KIT data storage and the online storage bwSync&Share eliminates the need for local backups. The data services that either make local data storage superfluous or store local data securely on remote hard disks of the SCC are described below. Here we provide information on:
- Use of the KIT data storage
- Use of the online storage bwSync&Share
- Backing up local data using a backup program
- Backup of Outlook mail archives (.pst files)
Use of the KIT data repository
The KIT data storage provides a personal and an OU directory via the central file server.
OU directory
The OU directory is a centrally provided, highly available data repository for the entire OU. The data is regularly backed up centrally and, if necessary, backup copies are available for restoration, so that no local data backup is necessary.
Personal directory
The personal directory serves as a central, highly available repository for personal data and documents. Here, too, the data is automatically backed up centrally so that no local backup is required.
Integration of the KIT data repository
Instructions on how to integrate the KIT data repository can be found on our website
Use of the online storage bwSync&Share
If certain data can only be processed locally on workstation end devices or should also be available locally without server access, it is possible to synchronize this data with a client program in the online storage bwSync&Share.
Notes on bwSync&Share
bwSync&Share is not a backup system that stores multiple file versions. In contrast to KIT data storage, it only provides the same file version that is also available on the synchronized end device.
Setting up file synchronization
To set up the bwSync&Share client for synchronization, proceed as follows:
- Download and install the client: Download the bwSync&Share desktop client from the official help page and perform the installation.
- Start client: Open the bwSync&Share client after installation.
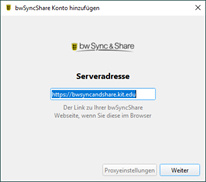
- Confirm server URL: The server URL https://bwsyncandshare.kit.edu is already preset. Click on "Next".
- Perform login: A browser window of the single sign-on provider (SSO) opens. Log in there with your KIT account and authorize the client.
- Set synchronization options: In the settings, select which folders from your bwSync&Share account should be synchronized with your local device (e.g. radio button "Synchronize all data from the server" or only certain data with radio button "Select items to synchronize").
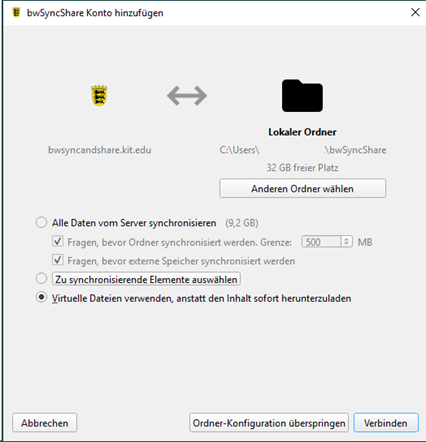
- Select local storage location: If necessary, change the local folder on your device in which the synchronized files are to be saved (click the "Select other folder" button).
- Complete the setup: Confirm your selection with "Next" to complete the setup and start the synchronization. The client will now start synchronizing the selected data.
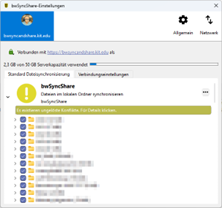
- Change settings: You can change the folders to be synchronized later. To do this, select "Settings" in the client (via their name) and add further folders or change the settings of the already synchronized folders.
Notes:
- File folders containing large amounts of data may not be automatically synchronized with your device, depending on the settings, but must be explicitly selected here.
- Embedded Outlook mail archives (.pst files) must not be synchronized. This would result in constant synchronization and cause the system to crash.
Backing up locally stored data to central data storage
If certain data can only be processed locally on workstation end devices, it is possible to back up this data to central data storage or other secure storage locations using a backup program.
For example, the backup and synchronization tool SyncBackFree can be used under Windows for this purpose.
Installation instructions and setting up SyncBackFree (without admin rights)
- Downloading the "NoInstall" version: The portable version is required for use without administration rights. The officially provided ZIP version of SyncBackFree without installation can be downloaded via this link
- Unpack and start: The ZIP file must be unpacked into any folder, for example Documents\SyncBackFree or onto a USB data carrier. The program is then started by executing the SyncBackFree.exe file in the unpacked folder. Installation is not required.
Preparation for the folder backup
- Create a new backup profile: SyncBackFree works profile-based.
Select the "New" button in the main window.
A profile name, for example Folder Backup, must be entered.
Select "Backup" as the profile type and confirm with "Next". - Selection of source and destination folder: Select a source folder for the backup.
The following storage locations can be used as destination folders:
Network folder (e.g. KIT data storage)
External hard disk
USB stick
Confirm the selection with "OK". - Optional customization of the profile: By right-clicking on the created profile and selecting "Modify", folders, filters and other options can be customized at any time.
- Executing the backup:
Select the desired profile.
Start the backup process with "Run".
SyncBack then displays the files to be backed up; the process is confirmed with "Continue Run".
Backup of Outlook mail archives (.pst files)
The mailbox is stored online on the Exchange server and does not need to be backed up separately.
Email archives are saved in a .pst file (archive file for personal Outlook data files), in which archives of emails, calendars, contacts and tasks can be saved locally on the PC.
The following steps describe how to back up Outlook mail archives
Find the location of the .pst file
- Open Outlook
- File → Account settings → Account settings... Click
- Select the Data files tab
- Select file → Open file location
A file window opens showing the folder in which the .pst file is located on your computer. Leave this file window open.
Back up the .pst file correctly
⚠️ Important: Close Outlook first!
Otherwise the backup may be corrupted.
How to back up the data:
- Close Outlook
- Copy the .pst file from the file window (folder)
- Save it in a safe place on the KIT data storage (see above).
- Embedded Outlook mail archives (.pst files) must not be synchronized. This would result in constant synchronization and cause the system to crash.
Briefly summarized
- Always use PST locally, never online or via network drives
- Close Outlook before backing up the file
- Create backups regularly
Other KIT data services
KIT offers additional data services for special application scenarios. The complete overview with scenarios and specifications can be found on the Data (Save, Share, Manage) website.